Understanding how to use an equalizer is an essential skill for audio enthusiasts and music producers alike. In this comprehensive guide, I will walk you through the intricacies of using an equalizer, empowering you to shape and transform your sound with precision and creativity. From demystifying different EQ types to exploring frequency bands and advanced techniques, this guide will equip you with the knowledge and tools needed to unlock the full potential of your audio productions. Get ready to dive into the world of equalization and discover the art of sonic sculpting.
EQ explained: what it stands for and its significance in audio production
Let’s start with the basics and get an answer to the central question, “What does EQ stand for?” EQ, short for Equalizer, is a fundamental tool in audio production that plays a vital role in shaping and balancing the audio frequencies within a sound system. Here you can check the best eq plugins.
In audio production, EQ is used to:
- EQ helps address frequency imbalances that can occur during recording or mixing.
- By boosting or cutting specific frequency ranges, EQ allows us to emphasize or de-emphasize certain elements.
- EQ can be used to create separation between different instruments or sounds, carving out their unique sonic space.
- By judiciously applying EQ, we can enhance the overall audio quality, optimizing the mix for different listening environments.
So, EQ, meaning equalizer, is a powerful tool that enables precise control over the audio frequencies. Understanding the role and significance of EQ is essential for audio producers and engineers as they strive to create professional-quality audio productions.
Breaking down the basics: understanding the parts of an equalizer

To effectively utilize an equalizer, it is important to understand its key components and how they work together to shape the sound profile.
So, let me break down the basics in this section:
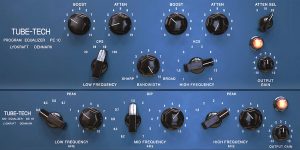
- An equalizer consists of multiple frequency bands, each representing a specific range of audio frequencies. Common bands include low, mid, and high frequencies, allowing for targeted adjustments in different areas of the sound spectrum.
- Sliders or knobs are used to control the intensity of each frequency band. By moving these sliders, you can boost or cut the corresponding frequencies, thereby modifying the audio balance.
- The Q factor, also known as the bandwidth, determines the range of frequencies affected by each slider. A narrow Q factor focuses on a specific frequency, while a wider Q factor affects a broader range. Understanding and adjusting the Q factor helps you achieve precise and surgical modifications or broad tonal changes.
These components interact dynamically to shape the sound. However, the underlying principles of frequency bands, sliders, and Q factor remain consistent across different equalizers.
Setting the stage: how to use an equalizer

In this section, I will provide practical tips on using an equalizer effectively to achieve the desired sonic results.
- Focus on the frequencies that are most critical for your mix. For example, vocals often require attention in the mid-range frequencies, while drums may need adjustments in the low end.
- It’s generally best to start by cutting frequencies rather than boosting. Cutting can help reduce muddiness or eliminate unwanted resonances.
- When making precise adjustments, use a narrow Q setting. This allows you to focus on a specific frequency range without affecting neighboring frequencies.
- Avoid drastic or excessive EQ adjustments that can result in an unnatural or artificial sound.
And remember, practice and experience are key in developing your ability to shape and sculpt the sound with precision and artistry.
Tailoring the tones: how to set an equalizer

Setting an equalizer is a critical step in achieving optimal sound quality and tone control. Further, I will provide you with practical tips and techniques for effectively setting an equalizer to address specific purposes:
- Define the desired outcome of your equalizer adjustments. For example, in music production, you may aim to achieve a balanced mix with clarity and separation. In live performances, you might focus on addressing room resonances or enhancing specific instruments.
- Listen attentively to your audio and identify frequencies that are causing issues or imbalances. Let’s say you’re working on a mix, and you find that the vocals lack clarity, and there’s too much muddiness in the lower midrange frequencies (around 200-500 Hz). This becomes your targeted area for adjustment.
- Begin by cutting frequencies that are problematic or excessive. In our example, you can use a narrow Q setting to reduce the muddiness in the lower midrange without affecting the neighboring frequencies. Then, selectively boost frequencies that require enhancement. You might decide to add some presence to the vocals by gently boosting the upper midrange frequencies (around 2-5 kHz).
- A/B testing can help you compare the impact of your changes and make refinements for optimal results.
Embrace the art of setting an equalizer and unleash the full potential of your audio productions.
Fine-tuning frequencies: how to adjust an equalizer
Adjusting an equalizer allows you to finely shape the sound characteristics of your audio. Let me provide you with a detailed guide on how to adjust an equalizer to achieve specific sound qualities and explain the significant impact that minor adjustments can have on sound quality.
- Determine the specific qualities you want to achieve in your audio. For example, if you’re working on a live sound setup and want to enhance the clarity of vocals, focus on the mid-range frequencies where the vocals reside.
- Begin by setting all the equalizer sliders or knobs to the neutral or “flat” position. This provides a balanced starting point for your adjustments.
- Instead of making drastic changes, start with minor adjustments to individual frequency bands. For instance, gently boost the targeted mid-range frequencies (around 3 kHz) to enhance vocal clarity without causing harshness or distortion.
- As you make adjustments, continuously assess the impact.
With practice and a discerning ear, you will be able to fine-tune your audio to perfection and unlock the full potential of your sound system or production.
Aiming for audio excellence: best equalizer settings

Finding the best equalizer settings is an essential aspect of achieving audio excellence. Now, I’ll share some examples of optimal equalizer settings for various music genres and listening scenarios:
- Different music genres have unique sonic characteristics, and adjusting the equalizer settings can enhance the listening experience. For example:
- Rock: Boosting the low frequencies (around 80-100 Hz) can add depth and punch to the rhythm section, while adding some presence in the high frequencies (around 3-5 kHz) can bring out the crispness of electric guitars.
- Jazz: Emphasizing the mid-range frequencies (around 800-1.2 kHz) can highlight the warmth and richness of instruments like trumpets and upright bass while a subtle boost in the high frequencies (around 8-10 kHz) can enhance the sparkle of cymbals and hi-hats.
- Electronic: Enhancing the bass frequencies (around 40-60 Hz) can give the low-end energy and impact while adding clarity in the high frequencies (around 10-15 kHz) can make synth melodies and electronic elements shine.
- Consider the environment and purpose of your listening experience when adjusting the equalizer settings:
- Home audio: Tailor the settings to match your room’s acoustics and personal preferences. For example, if you have a bright-sounding room, reducing the high frequencies can help achieve a more balanced sound.
- Headphones: Experiment with boosts in the low frequencies to compensate for the lack of physical subwoofer presence.
- Car audio: Due to the challenges of car acoustics, it can be beneficial to reduce the mid-range frequencies slightly to minimize the impact of road noise. Boosting the bass frequencies can compensate for the lack of low-end response in car speakers.
Remember, finding the best equalizer settings is a journey of discovery. Use these examples as guidelines, but ultimately let your ears guide you.
Conclusion
In conclusion, understanding how to set an equalizer is a valuable skill for achieving optimal sound quality and tonal control in audio production and playback. Whether you’re a music producer, sound engineer, or an avid music enthusiast, the knowledge and techniques I shared in this guide will empower you to unlock the full potential of your audio productions.
And if you’re passionate about taking your equalization skills to the next level, I recommend enrolling in the “Audio Equalization, EQ: Engineering HOT Sound With Equalizer.” This course will provide you with practical insights and advanced techniques to further enhance your mastery of equalization.
So, let the power of the equalizer elevate your sound to new heights!