Discover the transformative capabilities of parallel compression for vocals. This groundbreaking technique enhances vocal impact and control like never before. By combining compressed and uncompressed signals, parallel processing perfectly balances preserving natural dynamics and ensuring consistently powerful vocals. It’s the secret weapon that adds raw emotion and captivating polish to your vocal mixes.
In this article, I’ll take you through the process of implementing parallel compression, sharing essential tools and techniques. Get ready to unleash the transformative potential of parallel processing!
Parallel compression in classical mixing (New York compression)
")
Parallel compression, also referred to as New York dynamic control, introduces a distinctive level of impact and mastery to vocal mixes. This method entails blending a compressed version of the vocals with the untouched, uncompressed signal, resulting in a unique sound quality that confidently cuts through the mix.
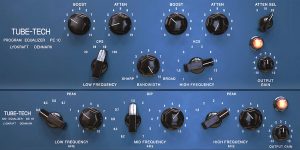
When employing New York compression techniques, combining it with a Pultec-type equalizer is customary. This fusion allows for sculpting vocal tonal balance while simultaneously governing their dynamics. The gentle yet melodious EQ curves of a Pultec-type equalizer seamlessly harmonize with parallel processing, guaranteeing a well-balanced and refined vocal sound.
Achieving the desired outcome hinges on comprehending the various processing parameters. One such critical parameter is the release, which dictates the speed at which the compressor returns to its normal state after the input signal drops below the threshold.
By experimenting with diverse release settings, you can meticulously calibrate the level of control and natural decay of the compressed vocals, resulting in a more unified mix. While the release parameter is merely a fragment of the parallel processing puzzle, it plays an indispensable role in shaping the overall sonic character and impact of the vocals.
Step-by-step guide on implementing parallel compression
Implementing parallel compression may initially seem daunting, but fear not! Here’s a step-by-step process to achieve optimal results:
- Duplicate the vocal track. Create a duplicate track to apply parallel compression separately from the original vocal.
- Apply heavy processing.
- Attack. Start with a moderate attack setting to retain the initial transients and the natural “punch” of the vocals. Adjust the attack time faster for a more pronounced compression effect or slower for a smoother, more transparent sound.
- Release. Experiment with the release time to find the sweet spot for the vocals. A shorter release time can add more sustain and tightness, while a longer release time can create a more open and natural sound. Listen carefully to ensure the release complements the overall feel of the mix.
- Ratio. Begin with a moderate ratio (e.g., 4:1 or 6:1) for a balanced compression. Increase the ratio for more noticeable compression and control, but be cautious not to overdo it and lose the natural dynamics.
- Combining Pultec-type equalizer with parallel compression. Integrating a Pultec-type equalizer with parallel compression can further enhance the impact and tonal characteristics of the vocals.
- Insert the Pultec-type equalizer on the parallel track. Use it to add warmth, presence, or sparkle to the vocals.
- Experiment with EQ settings. Consider boosting or cutting certain frequencies to achieve the desired tonal balance. For example, gently boosting the low end can add depth and richness, while boosting the high frequencies can bring out clarity and air.
- Blend the parallel track with the dry vocals. Use the fader or mix knob on the parallel track to adjust the level of the compressed signal until it sits well within the mix.
By following these steps and keeping what is a release in mind, you’ll be able to harness the power of parallel processing to create impactful and polished vocal mixes.
Tips for achieving a balanced mix using parallel compression techniques
To achieve a balanced mix while using parallel processing, consider the following tips:
- Set the appropriate dynamic control threshold. Ensure that the compressor is only activated when the vocal reaches a certain level. This maintains the natural dynamics while taming any excessive peaks.
- Use automation. Combine parallel processing with volume automation to maintain a consistent level throughout the vocal performance. This helps to address any variations in intensity and ensures the vocals sit well in the mix.
- Monitor with a critical ear. Pay attention to the overall balance and ensure that the vocals remain intelligible.
- Start with conservative settings. Begin with moderate compression settings and gradually increase the intensity until the desired impact is achieved. Be cautious not to over-compress, as it can lead to an unnatural and lifeless vocal sound.
- Experiment with different parallel processing chains. Explore various combinations of compressors, equalizers, and other effects in the parallel chain to find unique sonic textures that complement the vocals and enhance the mix.
By implementing these tips, you’ll be able to harness the power of parallel dynamic control, a key technique for achieving a balanced mix where the vocals shine with impact and control. Embrace the transformative capabilities of vocal compression through this technique and take your productions to excellence.
Advanced techniques of parallel compression

When it comes to achieving exceptional dynamic control, exploring advanced techniques can take your mixes to new heights. Using different types of compressors is the secret to unleashing a vast array of possibilities.
1176-type compression
Regarding assertive vocal parallel compression, one standout compressor in my arsenal is the LA-76, a faithful emulation of the legendary 1176. Having honed my skills through years of experience in mixing, I’m excited to share some insights on how to optimize compressor settings for vocals and attain the desired level of impact and control.
- Adjust the attack parameter to shape the initial transients of the vocals, emphasizing their sharpness. In this case, the attack values will be set to low.
- Fine-tune the release parameter to control the sustain and tail of the vocal notes, allowing them to sit in the mix seamlessly. For faster and sharper vocal parts, use lower release values to tighten and control dynamic peaks. For more measured sections, go with medium release values for a smoother and natural release that allows vocals to blend harmoniously.
- Find the ideal attitude setting to determine the character and intensity of the dynamic control, imparting a distinct sonic flavor to the vocals.
Optical-type compression
If you’re looking for tight and smooth parallel dynamic control, the LA-2A optical compressor is a fantastic choice. To achieve the desired warmth and transparency in your vocal mix, pay close attention to the compressor settings:
- Gain reduction control. Adjust the amount of compression applied to the audio signal using this knob. It allows you to shape the dynamics of the vocals to achieve the desired level of compression.
- Optical attenuator. The heart of the LA-2A, the optical attenuator consists of a light source and a photocell in an optical circuit. It imparts a smooth and transparent compression effect, adding warmth and smoothness to the vocals.
- Program-dependent release time. The LA-2A features a release time that automatically adapts to the input signal’s characteristics. It ensures a natural and musical release tailored to the dynamics of the vocals.
- These key features work in harmony to deliver the unique and musical compression characteristics that the LA-2A is renowned for.
Distressor-type compression
The versatile Distressor is a go-to choice for dynamic control, offering a wide range of tonal shaping capabilities. Explore the various compression modes such as opto, FET, and Brit, and consider the following techniques for creative vocal processing:
- Utilize the opto mode for smooth and transparent compression, allowing the vocals to sit naturally in the mix without sounding overly processed. The peculiarity of the Distressor in this mode is that this compressor offers the flexibility to adjust the attack and release parameters, unlike traditional opto compressors.
- Try the FET mode for a more aggressive and energetic vocal sound, adding punch and excitement to the performance.
- Experiment with the Brit mode to add a touch of vintage British console vibe to your vocals, infusing them with warmth and character. The beauty of saturation lies in the additional harmonics it brings forth, which can greatly enhance the clarity and readability of vocals within the context of the entire mix.
Fairchild-type compression
The Fairchild compressor is a powerful tool for vocals that exude warmth and richness in dynamic control. Based on my experience, I can offer tips for achieving a gentle and transparent dynamic control using Fairchild emulations.
- Set the input and output levels appropriately for subtle yet controlled dynamic processing, preserving the natural dynamics of the vocals while adding a touch of refinement.
- Experiment with different time constants to find the sweet spot that adds warmth to your vocals, finding the ideal balance between smoothness and articulation. Here’s my go-to method: for added articulation and clarity, I use values ranging from 1 to 3. When seeking a smooth, saturated vocal, I opt for a range of 3 to 5.
The ongoing debate surrounding whether to apply EQ before or after compression is a topic of much discussion among audio engineers. So, here’s the approach I offer:
If the original vocals possess a dull tone, excessive low-frequency hum, or certain unpleasant resonances, it’s advisable to place an EQ before the compressor. This allows you to address these issues and, if needed, accentuate the desired timbre.
On the other hand, if you’re fond of the original vocals and simply want to achieve the desired density level, it can be effective to position the compressor first. Following that, you can add an equalizer to infuse the signal with harmonics, enhancing its richness and warmth. This order of processing ensures that the compressor provides the desired control, and then the equalizer imparts a pleasing saturation to the vocals.
So, it’s all about finding the right order and balance that suits your groove.
Final thoughts
Alright, let’s wrap it up! We’ve explored the importance of getting hands-on and truly listening when it comes to mastering dynamic control techniques for different vocal styles and mixing situations. And let me tell you, being able to hear and feel the effects of dynamic processing is an absolute game-changer for any sound engineer.
Parallel processing is like an undiscovered treasure, empowering you to shape and enhance the dynamic range of voices and other audio elements. But here’s the thing – it’s not a one-size-fits-all kind of deal. Different vocal styles and mixing contexts call for different approaches. That’s why experimenting and pushing the limits of extreme compressor settings is so crucial.
If you’re eager to level up your compression game, I encourage you to dive into “Compression Made Easy.” Whether you’re a beginner or a seasoned pro, this course has something valuable to offer. With the right guidance and a willingness to experiment, you’ll be on your way to creating captivating mixes that leave a lasting impression. So, go ahead and give this course a shot – you won’t regret it. Happy mixing!