Nowadays, even if you are not a professional vocalist but still want to sound good and hit the notes, a wide range of instruments is available to you. The market offers different plugins that enable you to examine the sound as if it was magnified and edit every nuance of the performance. Some solutions allow you to smooth out multiple vocal parts with just a few clicks or automatically get the desired result out of the box, correcting notes or creating a stylistic sound.
Among a variety of instruments, I will help you choose the best pitch correction plugin for your needs.

What is pitch correction?
Pitch correction is a type of sound processing that can change the tone and character of a voice or instrument. Pitch correction plugins are commonly used for vocal pitch correction. With such an instrument, you can rectify nuances and inaccuracies in your performance and also use them as special effects, textures, and vocal part harmonization.
How to use pitch correction?

Before using the pitch shift plugin, remember that it must be placed first in your processing chain, or if you are using the standalone version, edit only the raw signal. That’s because all following processing – modifying, saturating, and changing the sound with modulation effects – will only complicate the instrument’s operation and may cause unwanted artifacts if it all goes into your pitch correction software’s detector. You can use a tuning plugin to balance the vocalist’s notes and create a perfect sound while maintaining nuances and recording vitality. Or you use the formant shifter to generate a special effect sound that retains the pitch but changes the sound’s character for low and high. The most common application of this technique can be found in Deep House music, where female vocals drastically change the formant, and the voice appears low while singing in a high register.
At the song’s peaks (usually choruses), you can pitch on backing vocals to harmonize with the melody of the main vocal and thus get a chord out of the voice. Several takes are usually sung or made artificially in the third and fifth while changing the manner of performance. Such a technique allows you to put together a very energetic and dense vocal group.
Best pitch correction plugins review
Antares Auto-Tune Pro X – best overall
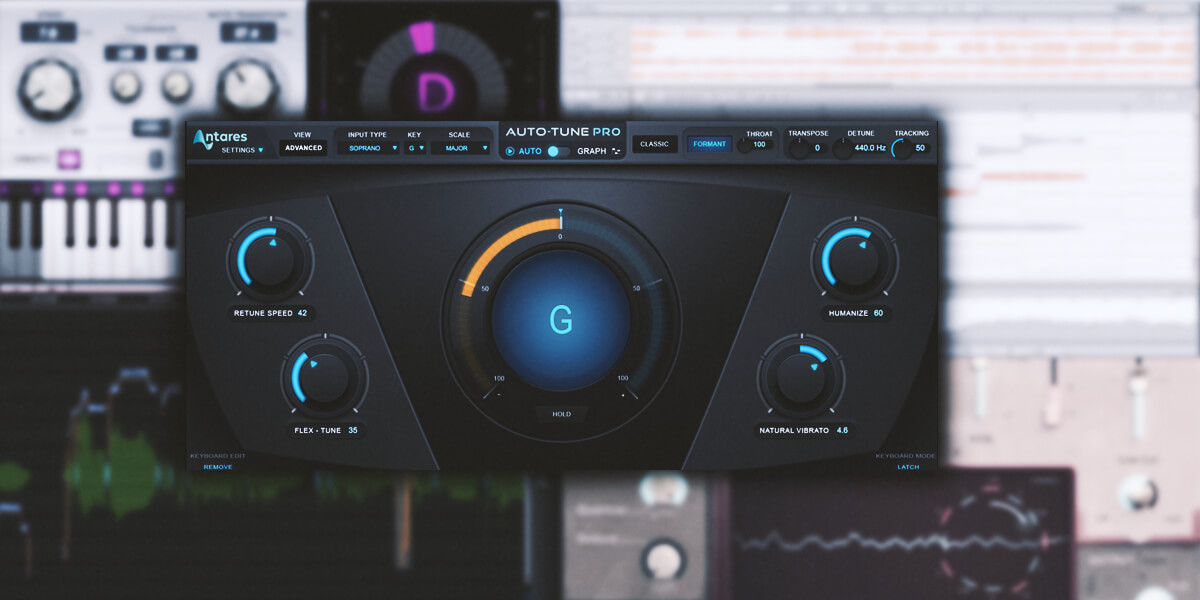
Auto-Tune Pro X is the most recent version of Antares autotune, which has become a pitch correction classic. One of the most distinguishing characteristics of modern commercial music in any genre is that vocalists hit the notes perfectly. And believe me, almost all successful songs you've heard used pitch correction. So, let's dive deeper into my Antares Auto-Tune Pro X review and find out what makes this plugin so special and how it can help your creativity.
Main features
If you've already tried an older version of the plugin and want to compare it with a new one, it'll be useful to know that Auto-Tune Pro X boasts the added ability to scale the interface for convenient switching between the modes. Now, you can also choose light or dark themes, making dealing with darker tracks easier on your eyes. Another update I love is the disabled Auto-scroll feature - progress through your audio without being disturbed by sudden jumps in waveform position.
The Pro X's modes are presented in two blocks - Modern and Classic. The former is a contemporary, flexible mode that provides a subtle and natural correction. The latter takes us back to the time of the fifth version, complete with numerous distortions; this mode allows you to generate the distinctive sound heard in modern hip-hop music.
The software provides various features to help you improve your vocals and ensure that they sound perfectly in tune. The Tracking controller allows you to focus on the most important frequencies in the signal and avoid reacting to extraneous noise. With the Learn function, the plugin detects and analyzes the type of voice or instrument you are using. In the Key and Scale settings, you specify your song tonality or link to the Auto Key plugin from Antares, which automatically detects the right tonality.
Other features I like and often use are Formant, Transpose, Detune control, and Mix. Formant allows you to make the voice lower or higher without changing its tone. Transpose modifies the signal by semitones, and for more detailed tone adjustments, you can use the Detune control. Mix regulates the ratio of the processed and unprocessed signal. I cannot fail to note the plugin's Advanced menu, where you can manually set the notes you want to hear in your song.
Get unnoticeable natural tone correction and special effect sound in the automatic mode by using low Retune Speed values. If some notes start to sound artificial, Flex Tune will help you to brighten them up. Natural Vibrato is a standalone tone correction that lets you adjust the vibrato to make it sound more natural. The Humanize function differentiates between long and short notes so that the correction can be adjusted more gradually and precisely.
To load your vocal into the graphical autotune mode, press the Pitch button and play the part you want to tune. After scanning, you will see the waveform of your vocal inside the plugin and the pitch curves in the piano roll. For added convenience, the Pro X allows you to correct notes by moving the blocks where they are located. In the Create Curves tab, you can also load curves from automatic mode and fine-tune them. You'll find correction tools in the Draw section. Use them to draw lines, curves, or blocks in the Note mode.
Overall, Auto-Tune Pro X offers advanced tools for working with individual sections of your signal - fine-tune any parameter you wish with precision, including formant, vibrato speed and depth, attack time, decay time, and more.
How does It sound?

With the help of Antares Auto-Tune Pro X, you can achieve incredible results with pitch correction - from special effects to very fine and deep vocal tuning.
Of course, working in graphical mode takes more time. However, it allows you to manually adjust the vocals so that no one will ever hear the effect, and the vocalist will hit all the notes very accurately. I always use this device when I need to get expensive, high-quality commercial vocals, regardless of the genre.
Tech specifications
- Platform: Mac, Windows.
- Formats: AAX, AU, VST, VST3.
- System requirements – Mac: macOS 10.14 or later, only 64 bit.
- System requirements – Windows: Microsoft Windows 10 or later, only 64 bit.
Waves Tune Real-Time
If you need real-time tuning with zero lag, then Waves has developed excellent software for this purpose. Actually, it's my go-to assistant for recording and live performances. The plugin also has some cool non-obvious advantages, which I will discuss in this Waves Tune Real-Time review.
Main features

Waves Tune Real-Time gives you a convenient way to shape the perfect performance quickly. The Speed regulator allows you to control the amount of pitch shift used for each note or syllable, resulting in more precise auto-tuning. You can also adjust the transition time between long and short notes to make sure your transitions are seamless and natural sounding. If you want a softer, more natural effect, I recommend starting with 15 milliseconds of Speed and 150 milliseconds of Note Transition, gradually increasing these values up to your taste. The Note Display shows you exactly what notes are being adjusted in real-time with bright colors so you can see your edits as they happen.
If you've achieved the desired sound but see some undesired distortions, you can fine-tune Waves Tune's performance with the Tolerance parameter. It is responsible for the time when the plugin does not rebuild a note, allowing for smoother correction. I also love Vibrato control here - it enables you to handle the vocalist's vibrato separately, accentuating or completely neutralizing it. By turning the Correction knob, you can adjust the level of correction applied. By the way, don't forget to activate Formant if you want a more natural sound.
Next, users have access to the Range tab, which allows them to choose the vocalist's range and facilitate the plugin's operation. And the Scale parameter will help you specify the scale at which you want to hear your vocals.
On a separate note, there is a fantastic option to use MIDI instruments to control the plugin's operation. Even better, you can write your own MIDI melodies that will play vocals. To regulate the operation of these parameters, the tool has a MIDI Input/Keyboard section. I'm sure you'll fall in love with Waves Tune once you learn how to use it!
How does It sound?

Since Waves Auto-Tune has zero latency, I find it particularly useful for monitoring singers who are already comfortable with singing in tune. However, I always make sure to include a dry signal track in my compositions.
I really enjoy using this plugin in Hip Hop and R'n'B genres. The flexibility of settings allows us to quickly get the tune effect, which is canonical for these genres.
Waves Tune is not suitable for serious sound interference when I want to get a subtle tune - there are better alternatives for that. But when I need to polish and finalize a high-quality, well-sung, or pre-processed vocal, I frequently use this particular tool, and it gives excellent results.
Tech specifications
- Platform: Mac, Windows.
- Formats: AAX, AU, VST, VST3.
- System requirements – Intel Core i7 / i9 / Xeon-W / Apple Silicon, 8 GB RAM (16 GB recommended), 16 GB disk space, Mac: macOS 10.9 or later, only 64 bit.
- System requirements – Windows: Intel Core i5, i7, i9, Xeon (all Gen 5 and above), AMD Quad Core, 8 GB RAM (16 GB recommended), 16 GB disk space, Microsoft Windows 10 or later, only 64 bit.
Celemony Melodyne 5 Studio
If you want to have complete control over your sound and perform manual pitch corrections to get an imperceptible tuning, Celemony Melodyne 5 Studio will definitely help you. With this plugin, you can also fine-tune the note duration and correct not only the pitch but also the rhythm. In this Celemony Melodyne 5 Studio review, I will consider in detail the possibilities and characteristics of this tool, and you will be able to make an objective decision about whether you need it.
Main features

Celemony Melodyne represents vocals as curves that are circled in blocks for easy moving through the pitches. One of the key advantages of the instrument is that we may fine-tune the sound sections that contain the most melodic component without affecting less important sounds for tonal sense.
Let's take a closer look at Melodyne's sound-handling tools. You can move curves in the piano roll by shifting their location with the Main tool (black arrow). The Pitch tool lets you adjust the smoothness of the transition from one note to another. The Formant, as the name implies, modifies the formant, lowering or raising the tone without changing the pitch. And with the help of the Amplitude tool, you can change the volume of individual notes.
One of my favorite tools is a Time tool that allows changing the length of a single note by varying the length of the surrounding notes when the Alt key is pressed. With this setting, you achieve a very smooth and subtle rhythm correction. Plus, the Note separation can cut curves, isolating the tonal component from breaths, sibilants, and noises.
It is important to understand that not everything that enters the plugin is a note. Along with notes, vocals frequently contain sibilants (letters c, sh), consonant sounds (b, p), and the singer's breaths. I strongly advise against meddling with these types of noises or doing so very carefully for the most natural fix.
I'd like to draw your attention to Melodyne's automatic correction block. You can totally rely on it in terms of pre-quantization, volume, and curve placement in relation to notes. To do that, use the following buttons - Correct Pitch Macro, Quantize Time Macro, and Note Leveling Macro. On the left side of the program, you can set the tone and rhythm of the song, which is especially useful when working in the Standalone version.
One of the main advantages of this plugin is the ability to work with a group of tracks at a time. The Track list tab greatly speeds up the process of editing an entire group of vocals, including back and double ones. You can select the track you want to work on at the moment and highlight the others. This is very useful when you have edited the lead vocal and now want to tune double tracks in the same way. The finished template is right in front of you.
How does It sound?

The main reason why many musicians love Celemony Melodyne 5 Studio is that it allows working not only with vocals but also with instruments, including percussion ones. If you're interested in this option, I suggest checking out the Algorithm tab.
Melodyne's interface is not the easiest to navigate, especially if you are a beginner. But as soon as you learn how to use it and customize hotkeys, you'll be able to work with a huge amount of material very quickly. To tell the truth, other pitch plugins take much longer to make such fine, detailed note edits.
I get astonishing outcomes with this software - after careful processing, the vocals sound perfect, without any trace of interference or correction. I strongly recommend trying this instrument if you want to get quality commercial results.
Tech specifications
- Platform: Mac, Windows.
- Formats: AAX, AU, VST, VST3.
- System requirements – Mac: macOS 10.12 or later, Intel Dual Core processor (Quad Core or better recommended), 4 GB RAM (8 GB or more recommended), only 64 bit.
- System requirements – Windows: Microsoft Windows 10 or later, Intel or AMD Dual Core processor (Quad Core or better recommended), 4 GB RAM (8 GB or more recommended), only 64 bit.
Synchro Arts Revoice Pro 4
You've probably heard about the Synchro Arts Revoice Pro 4 plugin if you deal with vocals or dialogs regularly. Initially, it was used for post-production. More specifically, the sound's rough cut was recorded right at the film set. Then, it was voiced over in the studio and aligned with the original audio track. That's what Synchro Arts Revoice Pro 4 was used for. However, this plugin showed amazing flexibility, which attracted numerous record producers. Now, Revoice Pro is a go-to solution for aligning vocals and instruments for a vast number of people working with vocal performances.
So, what's so special about this tool? Dive into my Synchro Arts Revoice Pro 4 review to learn more.
Main features

Revoice Pro 4 is a rare case of a genuinely unique application. But what makes it one-of-a-kind? Let's see.
To start a new sound alignment process, you've got to hit the B button. Right after that, you will be offered a few voice alignment options in a dialog window. That's where you get settings for any case - from minor synchronization that involves preserving the original pitch of every audio track to tighter double alignment with the capability to adjust the pitch to fit the original audio.
In case you want to synchronize more than two tracks and control them from a single panel, pick New Process Group once you select an algorithm. Then, you will be able to apply settings to all the alignment processes that fall within that group. Next, go to the Inputs tab to pick the Guide track and the one you want to double (Dub). Finally, make sure you specify the number of tracks you are going to align in the Number of processes field.
Sound processing settings are pretty flexible, which impressed me. The advanced Time and Pitch settings were extended with a Music synchronization mode in the 4th version of Revoice Pro. In the previous plugin iteration, only the Dialog option was available by default. With a Music mode, you can now achieve impressive results when processing extreme vocals like screaming or growling.
There is something special in Synchro Arts Revoice Pro 4 for those who want not only to align doubles but also to adjust the pitch. To access the note editor, pick the track, right-click below, and select "New Wapr." Set the default settings and click the "New Process" button. After this, you will see piano-roll and pitch curves you will be free to edit. By the way, the standard Alt + W button combo will automatically align the pitch of your signal. What I noticed is that this plugin is flexible when it comes to editing every single note, which slightly resembles Celemony Melodyne 5.
Accurate vibrato processing in this Revoice plugin is also worth noticing. As you use the Vibrato warp function, the app will break up the selected vibrato range into curves. So you can edit every vibrato element easily. You can set the initial and final vibrato points and adjust their continuity without compromising quality. I've never encountered such handy vibrato management in any other tools, really.
How does It sound?

I enjoy using Synchro Arts Revoice Pro 4 pretty much. With it, I create tight vocal stacks without any distracting sounds. I am also delighted by the ability to adjust the pitch right within the app, syncing all the layers with the Guide track. I should admit that this plugin saved me long hours of vocal alignment and processing. So, I highly recommend it if you value your time and would like to achieve great results in mixing, editing, and production.
Tech specifications
- Platform: Mac, Windows.
- Formats: AAX, AU, VST, VST3.
- System requirements – Mac: macOS 10.10 or later, only 64 bit.
- System requirements – Windows: Microsoft Windows 10 or later, only 64 bit.
Best free pitch correction plugins review
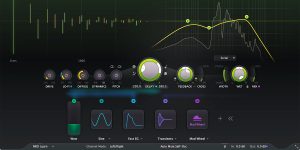
Graillon 2 Free Edition
In this Graillon 2 Free Edition review, I will look at the VST plugins that allow tuning vocals and changing their pitch. It is widely popular among music makers who need to correct the pitch, transpose the sound, mix it with additional tones, or process vocals with a bitcrusher. To be even more appealing, the plugin has a simple interface and is available for free.
Main features

For a free autotune, this plugin is quite versatile and is equipped with many useful features that allow you to optimize the sound. For instance, I find the pitch indicator pretty user-friendly because of its size. Also, you can use a low-cut filter for up to 900 Hz or transpose the voice one octave up or down.
The voice enrichment solution is also great. This is a fader that lets you add a copy of the original signal, which goes one octave or fifth up or down. Another peculiar feature is that you can calibrate the level of voice tuning by adjusting Smooth, Snap Range, and Reference parameters in the Correction section. Additionally, you may want to Preserve Formats as you process the sound with a dedicated feature.
Use a built-in bitcrusher to add distortion effects to the sound. This will let you make your track sparkle.
How does It sound?

I use the Graillon 2 plugin to quickly create robotic sounds and process back vocals or ad-libs. I was particularly surprised to see how it handles unusual use cases. For example, when I was modulating a signal from the aux track with a delay effect. I got amazing results!
Tech specifications
- Platform: Mac, Windows.
- Formats: AAX, AU, VST, VST3.
- System requirements – Mac: macOS 10.9 or later, 86 bit and 64 bit.
- System requirements – Windows: Microsoft Windows 7 or later, 86 bit and 64 bit.