In the realm of music production, harnessing the power of delay can be a game-changer, adding depth and dimension to instruments that captivate the listener’s ear. This article delves into the world of delay effects, exploring the art of crafting mesmerizing sound textures with precision and expertise. Get ready to uncover the best delay plugins that weave sonic magic into your musical journey.

Understanding delay in music

Wondering what is a delay in music? I’m going to reveal everything in this section!
Delay is a fundamental audio effect that shapes the spatial and temporal qualities of sound. It involves the repetition and playback of an audio signal after a brief period, creating the illusion of sonic reflections.
Its history traces back to the 1940s when tape loops were experimented with, evolving into analog units and later digital processors. The 1980s saw digital delay units gaining popularity, and today, software plugins offer vast possibilities.
In music, delay is an essential tool for creating ambiance, depth, and rhythm. Iconic songs like U2’s “Where the Streets Have No Name” utilize delay fx to evoke a sense of vastness, while Pink Floyd’s “Run Like Hell” employs rhythmic patterns for dramatic impact.
Examples of delay in popular music:
- The Edge’s signature delay-drenched guitar sound in U2’s “With or Without You”.
- The rhythmic repetition on the vocals in The Police’s “Every Breath You Take”.
- The ping-pong delay on the synths in Daft Punk’s “Around the World”.
Whether creating a dreamy atmosphere or adding a dynamic rhythmic element, this versatile effect continues to play a pivotal role in shaping modern music.
Understanding delay types
In music production, various VST delay types wield unique sonic signatures.
- Analog. This classic type uses analog circuitry to produce warm and organic repetitions. Its inherent imperfections and self-oscillation create a vintage vibe that many producers favor.
- Tape. Originating from tape recorders, this type offers lush, saturated echoes. Its wow and flutter effects, along with tape saturation, yield a distinctively nostalgic sound.
- Digital. Known for pristine and precise echoes, the digital delay is versatile and widely used. Its accurate repetitions make it suitable for various genres, from pop to electronic music.
- Ping-pong. This variant shuttles the delay signal between stereo channels, creating a bouncing effect. It’s a popular choice for adding spatial dimensions to mixes.
Choosing the right VST delay type depends on the desired mood and texture. Analog delay might infuse warmth into a vocal track, while tape one can elevate instrumentals with a touch of vintage charm. Meanwhile, digital VST delays offers precision for rhythmic patterns, and ping-pong one enhances stereo width.
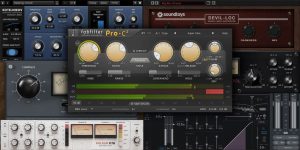
Best delay VST plugins review
Now, it’s time to delve into some standout VST delay plugins that have become indispensable companions on my music production journey. From versatile workhorses to vintage emulations, these plugins offer a rich palette of delays that can truly elevate your tracks to new sonic heights. Want to find the best delay plugin? Keep reading, and I will help you choose one!
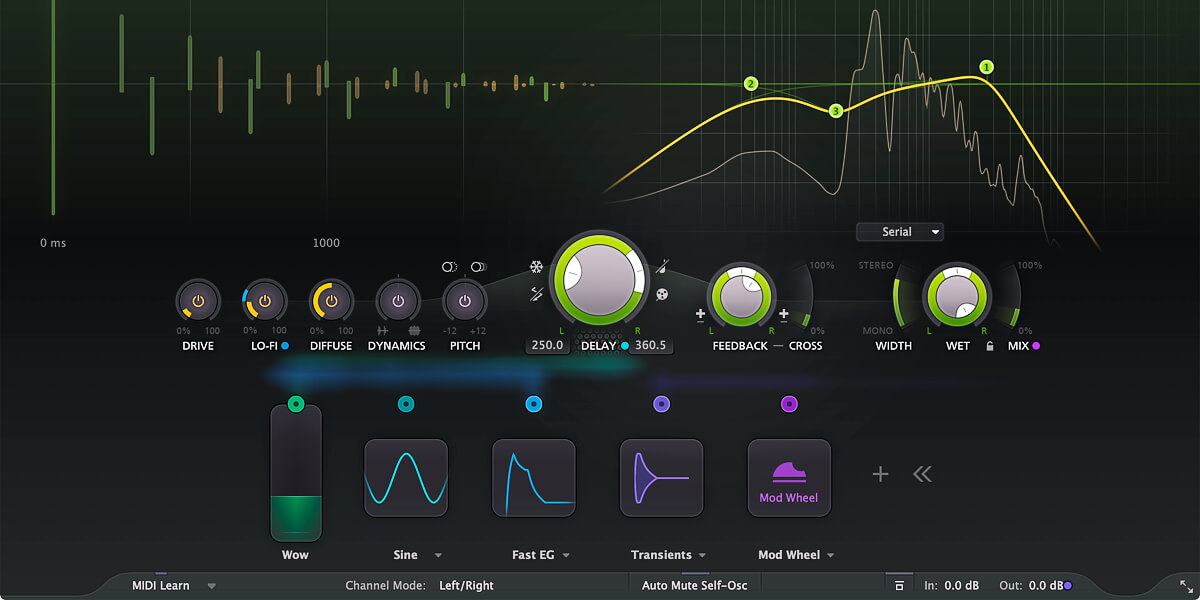
FabFilter Timeless 3 – best overal
Do you have a hard time finding that perfect delay plugin? In my FabFilter Timeless 3 review, I will present one of the most suitable VSTs that will surely satisfy your needs. It is flexible in terms of configuration. For instance, you get full control of each delay parameter and other in-the-box features, all without complex FX chains. Namely, you can set custom feedback algorithms and even transform the delay effect into a reverb. Even true enthusiasts will find something interesting in Timeless 3, like a parameter modulation block. What is it if not a gem?
Main features
Delay tabs are one of the core features of FabFilter Timeless 3. In the drop-down Tabs menu, you can randomize feedback repeats or set them in the desired direction, like upwards or downwards. Hold the Ctrl button, and create as many repeats as you want (up to sixteen!), set their position towards the grid, and make a panorama. Due to the flexibility of delay signal settings, you are free to create unique delay algorithms and creative effects, including reverb. By the way, as a bonus, the developer offers a huge collection of creative presets.
The equalization module is a six-band equalizer. It processes the signal in several modes: serial, parallel, and per channel. I especially like the feature that enables changing the sonic character of high-pass and low-pass filters. With this feature, you will achieve a truly unique and vivid sound.
You also get tools for additional signal procession here. In particular, these are 5 controls - faders and buttons. As you hit the effect button, you turn it on. Press the button once again to turn it off. This allows effortless A/B testing, so you know what new shades your signal gets with the particular effect. When you hold and drag the mouse button upwards, you intensify the effect, drag it down - and make it sound dimmer. The Drive regulator helps you add new harmonica and saturate the signal. Lo-Fi is also here to enable you to create the bitcrusher effect for a more pronounced sound in the mix. As you apply the Diffuse effect, you can blur repeats for a reverb-like effect. With the Dynamics set at the positive value, you get a tight and compressed signal. You may achieve a gate effect in the negative position, making the sound more rhythmical and choppy. Finally, the Pitch works great for changing the signal pitch within an octave.
Delay Time, the central control panel, is handy for setting the repeat time both in milliseconds and note duration tied to the project tempo. Here you will find plenty of amazing regulators. For example, you can set different delay times for the right and left channels separately. Using the Ping-Pong mode, you can alternate the delay repetitions between the right and left channels and set which channel will be the first to start producing delays. The snowflake symbol switches all the effects in the bypass mode. You can also choose between Tape and Stretch plugin algorithms. In addition, all the signal panorama and feedback, width, wet, and mix parameter controls are flexible and enable smooth adjustment.
I wish to specifically mention the modulation block. You can modulate nearly any plugin parameter using built-in tools like Envelope or LFO. I believe it's indispensable for creating unique rhythms and ripples and setting the direction of the entire track.
How does It sound?

I have used the Fabfilter Timeless plugin in every mix I make. It helps me with any type of material, from vocals and synths to percussion and creative textures. To my mind, this plugin provides unlimited room for creating a truly unique sound. I am a big fan of the modulation block, which I use for sound design and electronic music. Also, I insist that you try this plugin in the Mid-Side mode. Believe me, you will unlock incredible opportunities for yourself!
Tech specifications
- Platform: Mac, Windows.
- Formats: AAX, AU, VST, VST3.
- System requirements – Mac: macOS 10.13 or later, 86 bit, 64 bit.
- System requirements – Windows: Microsoft Windows 7 or later, 86 bit, 64 bit.
FabFilter Timeless 3 stands as an exceptional choice for enhancing a wide range of instruments, from melodic to percussive. Its versatility in settings, modes, and modulation capabilities makes it a top-tier, high-quality plugin suitable for any production scenario. Elevate your tracks with its comprehensive features and impeccable performance.
Soundtoys EchoBoy – stereo delay
So, you've come here to get recommendations on the delay plugin for every occasion. In my Soundtoys EchoBoy review, I will ponder upon the VST that will totally cover your needs. Add flexible settings, a variety of modes and saturation types, and independent channel control—that's a few things you will find especially interesting in the Soundtoys EchoBoy plugin. So, here you will learn all the amazing features of this VST, including the ones that enable you to create unique rhythms and reveal hit grooves for your tracks.
Main features

I roughly divide the EchoBoy controls into four blocks.
The first block rests on the left side of the plugin's interface. It has standard parameters for all delay effects. Echo Time control lets you set the delay time in milliseconds or sync it with the note length. With Mix, you pick the Dry/Wet signal correlation. Use Feedback to regulate the number of Delay effect repetitions of the signal the plugin processes. Low-pass and high-pass filters help you correct the tone. What may skip your attention in this block is the Prime Numbers switch. When you set short values for the Echo time, you may notice short echoing blasts that do not sound good. Use the Prime Numbers feature to undermine the bad sound.
Tweak is a small yet extremely handy button. It works great for making more accurate settings for the stereo-width of the processed signal, right and left channel delays (to let you create a Haas effect), and accents.
The second control block targets a more precise rhythm configuration, which you can carry by adjusting the behavior of the processed signal. The Tap Tempo feature is awesome—you can tap the rhythm you want to have in your mix. Or you can go to Midi to sync it with the project tempo.
Groove and Feel are one of my favorite tools for creating movement in music. These two parameters impact the processed signal rhythm, allowing you to delay or speed it up in relation to the grid. I am fond of playing with the settings of these two tools. I apply them to rhythmic sections, choppy instrumental parts of the track, or rhythmic hip-hop vocals.
I recommend you spend some time practicing and learning how these regulators work. And you will see by yourself how they can change the nature of your static track. Then, with the right settings, you will add movement to your music and enrich it with juicy grooves.
The EchoBoy plugin will deliver a single delay chain with the Single Echo mode. While the Dual Echo mode will add two delays with an option of setting two time values for each. The Ping-Pong effect is classic, enabling you to achieve a stereo effect when the sound is reproduced with the same volume from two channels interchangeably. And, of course, meet a unique Rhythm Echo mode. I like how it shows itself in percussion. With this feature, you can set the behavioral pattern of the processed signal, creating brand-new and creative movement in the music.
The third block helps configure the Input and Output signal level, which has a dramatic effect on the Saturation parameter. The greater the input signal, the more saturation the sound can get. In this block, you can select the delay model from the 32 available. Each of them is unique and amazing.
I've finally reached my favorite part—Style Edit. I do like this feature. Once I selected the delay model and configured the groove, I could take a deeper look inside and delve a little bit deeper.
Here you will find a flexible three-band EQ section: Low, Mid, and High. The Diffusion switch helps you diffuse the sound, making it similar to reverb. To add a chorus effect, use the Wobble feature (which has different modes, by the way). You can also apply more accurate Saturation settings picking from the Clean or Dirt saturation style.
How does It sound?

As I look at all the projects created over these years, I can certainly say that I've used the Soundtoys EchoBoy plugin in nearly every mix. It indeed has plenty of delay types because you can accurately adjust parameter settings and pick among a variety of styles and modes. So, I believe it is a good choice if you work with different genres. I personally like to use this VST for vocals and percussion. With the Rhythm block, I create unique rhythms and grooves for the music I work with. I totally recommend this plugin for everyone who feels stuck and wants to add new shades and grooves to their project.
Tech specifications
- Platform: Mac, Windows.
- Formats: AAX, AU, VST, VST3.
- System requirements – Mac: macOS 10.12 or later, 86 bit and 64 bit.
- System requirements – Windows: Microsoft Windows 7 or later, 86 bit and 64 bit.
Soundtoys EchoBoy is an excellent tool for achieving expansive soundscapes in your mix’s core elements. Its high-quality ping-pong repetition algorithm adds depth and width to your tracks. With an intuitive interface and a plethora of advanced options, this stereo delay plugin is a must-have for enthusiasts seeking both simplicity and versatility.
D16 Group Repeater – digital delay
In this D16 Group Repeater review, I will dwell on the delay plugin that boasts several important perks. In particular, it has a user-friendly interface that provides maximum control over the process and makes it easy to use all the system's features.
In this VST, the developer offers 23 unique delay models, from digital to analog shades of sound. I am convinced you will find a decent spot for this plugin in your mixes.
Main features

As I was using this plugin for the first time, I couldn't help but notice its interface—pretty stylish but without overloading it with details. What instantly riveted my attention was a convenient link parameter. You can set different parameters for the right and left channels as you turn off linking. Use the Delay time option to adjust the delay time according to the project's rhythm or set millisecond values. What's interesting is that you can apply separate Feedback values for each channel and achieve an amazing stereo effect. If necessary, you can invert the phase with the Phase invert button.
The equalization block looks familiar: it has low-pass and high-pass filters. Yet, this Repeater gets a Color feature that combines the mid-range equalization and clipper properties.
You can control the panorama and mix for every channel separately. This provides ample opportunities for automatization.
More precisely, there is a Ping-Pong button at the bottom of the plugin interface and an Analog button, which you can use to add saturation to your signal. The Spread control is here to enable you to broaden the signal's stereo panorama. That's how you add a chorus effect that works differently for left and right channels to your sound.
To my mind, the most important button in this plugin is Delay Model. The developer provides you with a wide range of choices — pick any of the preset 23 delay models. Here you will find Digital and Tape delays, special effects like radio or telephone, as well as various types of delay, which change the pitch. You will also encounter some of the iconic tools. For example, Space delay emulates the operation of the legendary Roland Space-Echo RE-201. I was pleased with these model choices.
How does It sound?

The D16 VST impressed me with its performance, especially when working with vocals and instrumentals in my mixes. To my mind, one of the greatest peculiarities of picking the delay model for this or that song lies in the simplicity of the plugin's use and understanding of its capabilities. As I spent time learning how the delay models of this VST work, I immediately grasped where I could use every particular model. For example, I can obtain the desired sound with Repeater without spending much time on its creation. The only thing that didn't meet my expectations was the vintage-like sound. Also, I couldn't achieve rich analog sound without extra processing. But when it comes to creating digital delay effects, I find this plugin indispensable.
Tech specifications
- Platform: Mac, Windows.
- Formats: AAX, AU, VST, VST3.
- System requirements – Intel based 2.0GHz (2.4 GHz recommended), Apple Silicon, 8GB RAM (16GB recommended), Mac: macOS 10.13 or later, only 64 bit.
- System requirements – Windows: 2.0GHz SSE (Multicore 2.4GHz recommended), 8GB RAM (16GB recommended), Microsoft Windows 7 or later, 86 bit, 64 bit.
D16 Group Repeater, celebrated for its vintage emulations, serves as a versatile digital delay plugin. Despite its inclusion of nostalgic models, I primarily leverage it for its digital capabilities. Its modest CPU demands and intuitive controls facilitate quick and satisfying results. The plugin seamlessly integrates into my production workflow, making it an invaluable tool for adding character to my tracks.
Pulsar Audio Echorec – analog delay
Often, to recreate a warm atmosphere in a track, you can only do with analog instruments or their emulations. Today, I will review an analog delay VST from the Pulsar company. Pulsar Echorec is a software emulation of the legendary Echorec device from the Binson brand, which was used on recordings by Pink Floyd, The Shadows, Jimmy Page, and others. In this Pulsar Audio Echorec review, you will learn how to create a unique vintage atmosphere and what really makes this plugin so good.
Main features

In the 1970s, the analog Echorec stood out among other delay effects because it did not work with tape but rather by means of a rotating magnetic disk. This important detail forms the sound tone of the output, giving it a special vibe. In my opinion, the developers of Pulsar have brilliantly conveyed the character and behavior of this device.
The controls are designed in a familiar style for many users. The Mix knob adjusts the ratio of the dry and wet signal. The Feedback parameter allows you to set the number of repetitions before the signal fades out. The higher the value, the longer the delay effect lasts.
The Delays control allows you to select combinations of playback heads for the delayed sound. Only one playback head (like in a common delay) works in the 1 - 4 modes. From 5 to 12 modes, several playback heads are combined to create rhythmic patterns. In the Off mode, the plugin works as a saturator, allowing you to get harmonics from transformers, tubes, and magnetic disks.
The Sync button turns synchronization with the project tempo on and off, while Disk Speed allows you to set the delay time. The TAP button allows you to tap the desired rhythm. With the Drive control, you can add saturation to the signal, and with the Volume knob, you set the volume output level.
The Mode switch allows you to select one of the operating modes of Pulsar Echorec and opens up a wide range of colors and grooves you can use in your music, from a classic delay effect to interesting rhythmic patterns and reverb effects:
- Echo - a single repetition mode recommended by the developer for creating the classic slapback delay effect.
- Rip - in this mode, playback heads selected with the Delays knob are fed back into the input, creating multiple repetitions.
- Swell - only those playback heads you have selected in the Delays mode are fed back into the input. Yet, all playback heads are present in the output, which causes even more repetitions (sometimes even resulting in reverb-like sonorities).
The equalization block is represented by the Tone knob. Moving it towards Bass produces a darker, more muted sound while moving it towards Treb results in a brighter, more open sound.
Another unique feature for shaping the sound tone is the Condition switch. It allows you to select one of three plugin operating modes with respect to the analog character:
- Used - a mode in which the outgoing signal has a fairly high level of noise and noticeable saturation, which is great for adding more character to the sound.
- Good - a well-calibrated device sound with a peculiar vintage feel and a slight level of analog noise.
- Mint - a maximum clean sound without distortions and pitch changes, to the extent that is possible for analog devices.
With the Stereo Drift regulator, you can shift the sound to the left or right channel.
Among the presets, the developer provides excellent ready-made solutions for achieving the signature sound of legendary bands. I recommend all classic rock lovers check out the Floydish category.
How does It sound?

I love using this plugin in different musical genres. The variability of delay effects and the ability to saturate the signal at the same time open up more possibilities for using this device.
For example, when I have a sparse arrangement with a lot of space dedicated to spatial effects, I like to add warmth and vintage saturation to vocals and guitars and mix in long tails to create depth in the track.
In electronic music, when the arrangement is dense, I like to mix in zero-delay with lead synth, adding more Drive. Here, I use it as a saturator, thus emphasizing the character of the sound and saturating it with new harmonics. This approach makes the sounds maximally audible on any acoustic system.
Tech specifications
- Platform: Mac, Windows.
- Formats: AAX, AU, VST, VST3.
- System requirements – Mac: macOS 10.9 or later, Intel Core i3/i5/i7/Xeon/Apple Silicon (M1), 4GB RAM, 1GB free disk space, only 64 bit.
- System requirements – Windows: Microsoft Windows 7 or later, Intel Core i3/i5/i7/i9/Xeon or AMD Quad-Core minimum, 4GB RAM, 1GB free disk space, OpengGL 2.0 compatible GPU, only 64 bit.
Pulsar Audio Echorec, my go-to analog delay plugin, is my secret weapon for injecting character into signals. It effortlessly imparts beautiful reflections that seamlessly blend into mixes. The versatile saturation algorithm offers a spectrum of sonic possibilities, from warm and gentle to assertively aggressive, adding impactful dynamics to my composition.
Arturia Delay TAPE-201 – tape delay
For this review, I've selected Delay TAPE-201 from Arturia as a tape delay VST plugin. Why this particular instrument? It emulates a legendary analog device — Roland RE-201 Space Echo Tape Delay/Reverb. To my mind, the vintage-peculiar sound successfully comes together with a flexible software solution in this plugin. So, in this Arturia Delay TAPE-201 review, I will ponder upon the peculiarities of this plugin and explain what makes it so great.
Main features

Let's look into the main features of the Arturia Delay TAPE-201 plugin to get a better idea of its capabilities.
First, I suggest checking the Input Volume, which allows you to adjust the input volume of a signal. The value you set will greatly impact the saturation level. Higher input volume level results in a signal greatly saturated with harmonics. The peak level will point at the availability of peaks that go higher than 0db. Right below this indicator, you will find a toggle switch for changing preamp operation modes. You get a clean and undistorted signal when set to the '0' value. 'I' stands for Original RE-201 preamp imitation. Finally, 'II' means Arturia's vintage Germanium preamp.
With Delay type, you can select between different delay types, which include:
- L/R — a standard mode for delay effects that transmits the left and right channels through the entire plug-in processing chain.
- Ping-pong — works similarly to L/R, passing the signal from the left and right channels, but interchangeably. The processed signal is reproduced from the left and right channels in turns.
- M/S - is an uncommon mode for delay plugins, which splits the signal into Mid (mono) and Side (stereo) and transmits them through the entire processing cycle of the device. Because of this, you can achieve an enjoyable and broad sound.
A few words about the Mode selector, which determines how the 3 tape playback heads and reverb tank are combined. In the Reverb only mode, you will get a spring reverb signal, which intensity you can regulate with the Reverb volume knob. With Active heads, you will see which delay heads are presently active.
The 1-4 modes are handy when you want to hear how delay heads and their combinations work. As you switch to 5-11 modes, delay heads are mixed with reverb to let you create a sound that resembles echo. With such a great number of combinations, you can create completely different styles and grooves, which can be useful in absolutely any style.
Now let's talk about the Repeat rate. I find it to be convenient for setting the delay time. Using the Sync button, you can link it to the project note length, while the Link button (a chain-like one) allows you to synchronize the parameters or set different values for the left and right channels or Mid and Side, which in its turn, allows you to achieve a wide sound.
Also, the Delay TAPE-201 plugin unlocks access to additional stereo capabilities that let you achieve a spacious sound in a Stereo block. The Width knob is here to let you narrow or broaden the stereo field. At the same time, with the Rate Offset regulator, you can additionally desynchronize the channels in time and pitch, getting a sort of Haas effect.
It's good to have the Intensity parameter that sets the amount of echo signal reinjected into the echo chamber. So, it may resemble the Feedback parameter many of you have probably gotten used to. Also, there is an Echo volume that gives you space to adjust the output level of the echo. The Dry/Wet knob regulates the original and processed signal ratio.
The timbre block comes as Bass (sets the number of low frequencies) and Treble (sets the amount of treble) controls. Equalization works gently, allowing you to carefully shape the sound timbre at the output.
To fine-tune the signal, there is an Advanced button in the upper right corner of the plugin's interface. It opens additional settings of incoming signal equalization. As you use Low-pass and High-pass filters, you will set the low and high-frequency cutoff. With the EQ peak frequency, you can set which frequency you want to give the most presence.
Motor interia sets the time the tape motor needs to switch between two rates. Flutter is the amount of frequency wobble introduced by irregularities in tape speed. Noise enables you to mix in analog noise.
The LFO block is a godsend for everyone who is involved in creating special effects. It gives its users the possibility to module any delay parameter with shapes. You can pick a specific parameter in the Destination drop-down menu and adjust the LFO amount and Rate time to your liking.
How does It sound?

As this delay plugin is highly versatile, you can use it to work with different genres. For instance, this is my go-to tool when I work on Reggie mixes. It allows me to add spring reverb to the delayed signal and better convey the style of the genre. And, in general, when it comes to spatial guitar processing, there is hardly a better plugin than this tape delay VST. Using an LFO tool, I can create unique wah-wah effects listeners love.
This plugin also turned out to be quite practical when working with vocals. The preamp feature is particularly helpful because it allows me to add vintage-like saturation and give more prominence to the sound. In addition, I achieve a beautiful depth effect as I use this delay with the high Intensity (feedback) value at the end of vocal phrases. And when I strive to make a broader lead vocal, I use Stereo imaging capabilities.
My favorite percussion approach is to create syncopated rhythms with the delay effect. Thanks to the flexibility of parameter settings and the Mid/Side mode, I always achieve amazing results.
Tech specifications
- Platform: Mac, Windows.
- Formats: AAX, AU, NKS, VST, VST3.
- System requirements – Mac: macOS 10.13 or later, OpenGL 2.0 compatible 4 cores CPU, 3.4 GHz (4.0 GHz Turbo-boost) or M1 CPU, 1GB HDD, only 64 bit.
- System requirements – Windows: Microsoft Windows 10 or later, OpenGL 2.0 compatible 4 cores CPU, 3.4 GHz (4.0 GHz Turbo-boost), 1GB HDD, only 64 bit.
Arturia Delay TAPE-201, a must-have tape delay plugin, excels in delivering authentic tape emulation. The hardware-inspired algorithms offer a remarkably realistic experience, further adjustable within the plugin. It’s a go-to tool for infusing mixes with vintage vibes, grain, and the atmospheric essence of a bygone era.
Best free delay VST plugins review
When it comes to adding depth and a touch of magic to my music, being free doesn’t mean compromising on quality. Among the gems I’ve discovered in the world of free audio plugins, BABY Comeback stands out as a true vintage delight. You’re probably wondering, “What is a delay plugin named BABY Comeback, and does its performance suffer from being free?”. Read further to find out!
BABY Comeback
Welcome to my BABY Comeback Plugin review, where I unwrap the details of a high-quality yet free delay plugin. Crafted by BABY Audio, this tool serves as a beacon of proof that free plugins can truly elevate your sound. A cost-effective revolution is on the horizon.
Main features

Flavor
Now, we'll delve into this plugin's 'Flavor' aspect. It's an exciting feature that offers four unique modes to alter and enhance your delay, adding the right twist to your sound.
Wide
The Wide mode in the BABY Audio Comeback broadens your horizons, quite literally. This feature expands the stereo sound image, giving your audio a rich, encompassing feel. It's a great tool for tracks needing that larger-than-life, immersive sound – think grand orchestral scores or atmospheric synth pads. The sound is all-encompassing with this plugin.
Analog
Moving onto Analog, another gem within the Comeback toolkit. This function gives your signal a warm, vibrant touch of analog saturation, making it cut through the mix with enhanced presence. Ideal for livening up dull vocal tracks or adding weight to your snare drum, Analog mode provides that vintage, organic feel we often crave in digital soundscapes.
Saucey
Up next is the Saucey mode - the spice in your audio recipe. This option stretches the delay effect, creating a longer tail that mirrors a reverb. It shines brightly when you add dreamy trails to your lead guitar lines or craft ambient music, providing that spacey aura. Saucey helps your sound float in an ethereal sonic sea.
Cheap
Cheap is a curious yet valuable player in this plugin's toolkit. It goes the extra mile by applying a bit-crusher to your signal, enabling you to carve out a distinctly lo-fi sound. Whether you're seeking that gritty edge for your EDM tracks or adding a touch of retro charm to chiptune music, Cheap mode provides a tonal detour straight into nostalgia.
Time
Delving deeper into the functionality of this delay VST plugin, we arrive at the Time feature. This control is all about setting the length of the delay effect in your mix. The real beauty lies in the option to tie the delay time directly to specific note lengths. It covers everything from whole notes to dotted notes and even triplets. This level of precision ensures your delay effect rhythmically complements your tracks, bringing unity and cohesion to your sound. A versatile tool, indeed!
Feedback
The 'Feedback' feature is essentially the backbone of your delay effect. It adjusts the number of times the delayed signal is fed back into the system, controlling its persistence in the mix. Think of it as an echo's lifespan - a higher feedback setting means the echo will linger for longer, creating a cascading, rhythmic ambiance. Lower feedback settings, on the other hand, allow for a more discrete and controlled delay, ideal for nuanced touches.
Ducker
The Ducker is a mini sidechain compression wizard tucked inside this plugin. It helps control the level of the delayed signal based on the original's intensity. When your original signal plays loud and proud, the Ducker suppresses the delayed echo, allowing clarity and reducing muddiness. This feature is perfect for situations where you want the delay to be prominent but not compete with the original sound - such as in busy mixes or lead vocal tracks.
Dry/Wet
Rounding off our feature exploration, we touch upon the Dry/Wet controls. These knobs are all about finding the perfect blend of your unprocessed 'dry' signal and the 'wet' or affected signal. Turning up the 'wet' control increases the prominence of the delay effect while adjusting the 'dry' control allows the original sound to shine through. The power of balance is at your fingertips, allowing for a seamless fusion of processed and unprocessed signals, thus shaping your unique sonic canvas.
How does It sound?

Based on my personal experience, the answer is simple yet gratifying - it sounds great. The ease of use is remarkable, allowing even beginners to access high-quality delay effects without getting lost in complex interfaces.
The functionality is robust, with each feature tailored to sculpt your sound precisely. Wide mode is an instant recipe for a larger-than-life, immersive sonic experience, while Analog adds a touch of vintage warmth. The Ducker excels in managing busy mixes, ensuring your delay doesn't overshadow primary elements.
On the downside, the Cheap mode might not suit everyone's taste, especially if you're not into lo-fi vibes. However, used sparingly, it can introduce an interesting tonal variation to a standard mix.
Overall, the BABY Audio Comeback adds depth, vibe, and a distinct character to your sound, making it a valuable addition to your plugin arsenal. Whether you're a seasoned pro or a budding producer, this free tool can elevate your mixes to new heights.
Tech specifications
- Platform: Mac, Windows.
- Formats: AAX, AU, VST, VST3.
- System requirements – Mac: macOS 10.9 or later, only 64 bit.
- System requirements – Windows: Microsoft Windows 7 or later, only 64 bit.
BABY Comeback, my go-to vintage VST time lag plugin, brings timeless charm to my tracks without costing a dime. This plugin captures the essence of classic hardware, delivering warm echoes that seamlessly infuse my mixes with character. Its user-friendly interface and authentic tape-like sound make it the best free delay plugin for any music enthusiast seeking a touch of nostalgia.
Difference between delay and echo

The terms “echo” and “delay” often intertwine, creating a sense of sonic confusion. But fear not, for understanding the nuances between these two is like deciphering between similar yet distinct musical notes.
Here are the key differences between delay and echo:
- Echo is a specific type of VST time lag that involves distinct, audible repetitions of the original sound, mimicking the reflection of sound in a vast space.
- Echo plugins emphasize pronounced repetitions, adding a sense of spaciousness and depth to the audio. On the other hand, a traditional delay plugin will offer more control over timing and feedback, allowing for intricate rhythmic patterns and spatial enhancements.
The echo vs delay debate continues to inspire creativity and experimentation in music production, as both effects bring their unique temporal allure to shape compositions with captivating auditory reflections. Whether you seek the expansive grandeur of echo or the rhythmic dance of VST time lag, exploring the difference between delay and echo opens up a world of new possibilities.
Difference between delay and reverb

The difference between delay and reverb is as vital as the notes themselves. Let’s uncover their unique roles:
- Definition and nature:
- Reverb: Imagine sound in a vast cathedral, its reflections bouncing off walls. Reverb imitates this ambiance, creating a sense of space.
- Delay: Picture sound echoing in a canyon. Repetition duplicates this rhythmic repetition, adding depth and texture.
- Characteristics:
- Reverb: Reverberations blend sounds, making them harmonious and immersive.
- Delay: Deliberate echoes introduce rhythm and dimension to individual sounds.
- Impact on sound:
- Reverb: It molds sound’s environment, like shaping clay, offering warmth and depth.
- Delay: It’s like a musical heartbeat, infusing rhythm and movement into audio.
While both echo and delay plugins play vital roles, they paint vastly different strokes on the music canvas, allowing creators to craft unique auditory experiences.