Modern technologies make the process of making high-quality audio tracks easier and more efficient than ever before. Various hardware units that were used for adding some interesting effects to music in previous decades are now getting digitalized and obtaining new functions. A compressor is one of the most essential tools for any music producer. But how to choose the best compressor plugins? What features and capabilities should it provide?

Among its functions, you will find tightening up the dynamic range of signals that makes it easier to balance them with each other. This also helps to adjust transients so that the attack of kick or snare drums is expressed differently. The plugins also inherit the rich tonality of the old hardware compressors, allowing them to add harmonic content to the soundtrack.
What is compression in music?
Compressor VST is used to reduce the entire dynamic range of an audio track. It detects moments when the sound exceeds a specified level and then attenuates it by a certain amount. To put it simply, compressors equalize the difference between the loudest and softest parts of an audio track, thus giving you more balanced and well-sounding music. The best compressor plugin can have some extra features that can add various effects or be extremely thorough in terms of its main function.
Best compressor plugins review
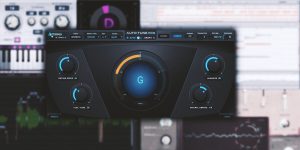
Fabfilter Pro C-2 – best overall
Fabfilter Pro C-2 review will help you get acquainted with this software product. My article will be helpful if you are a novice producer, a professional musician, or just passionate about music creation. You will learn about its features, unique functions, as well as advantages and disadvantages.
Main features
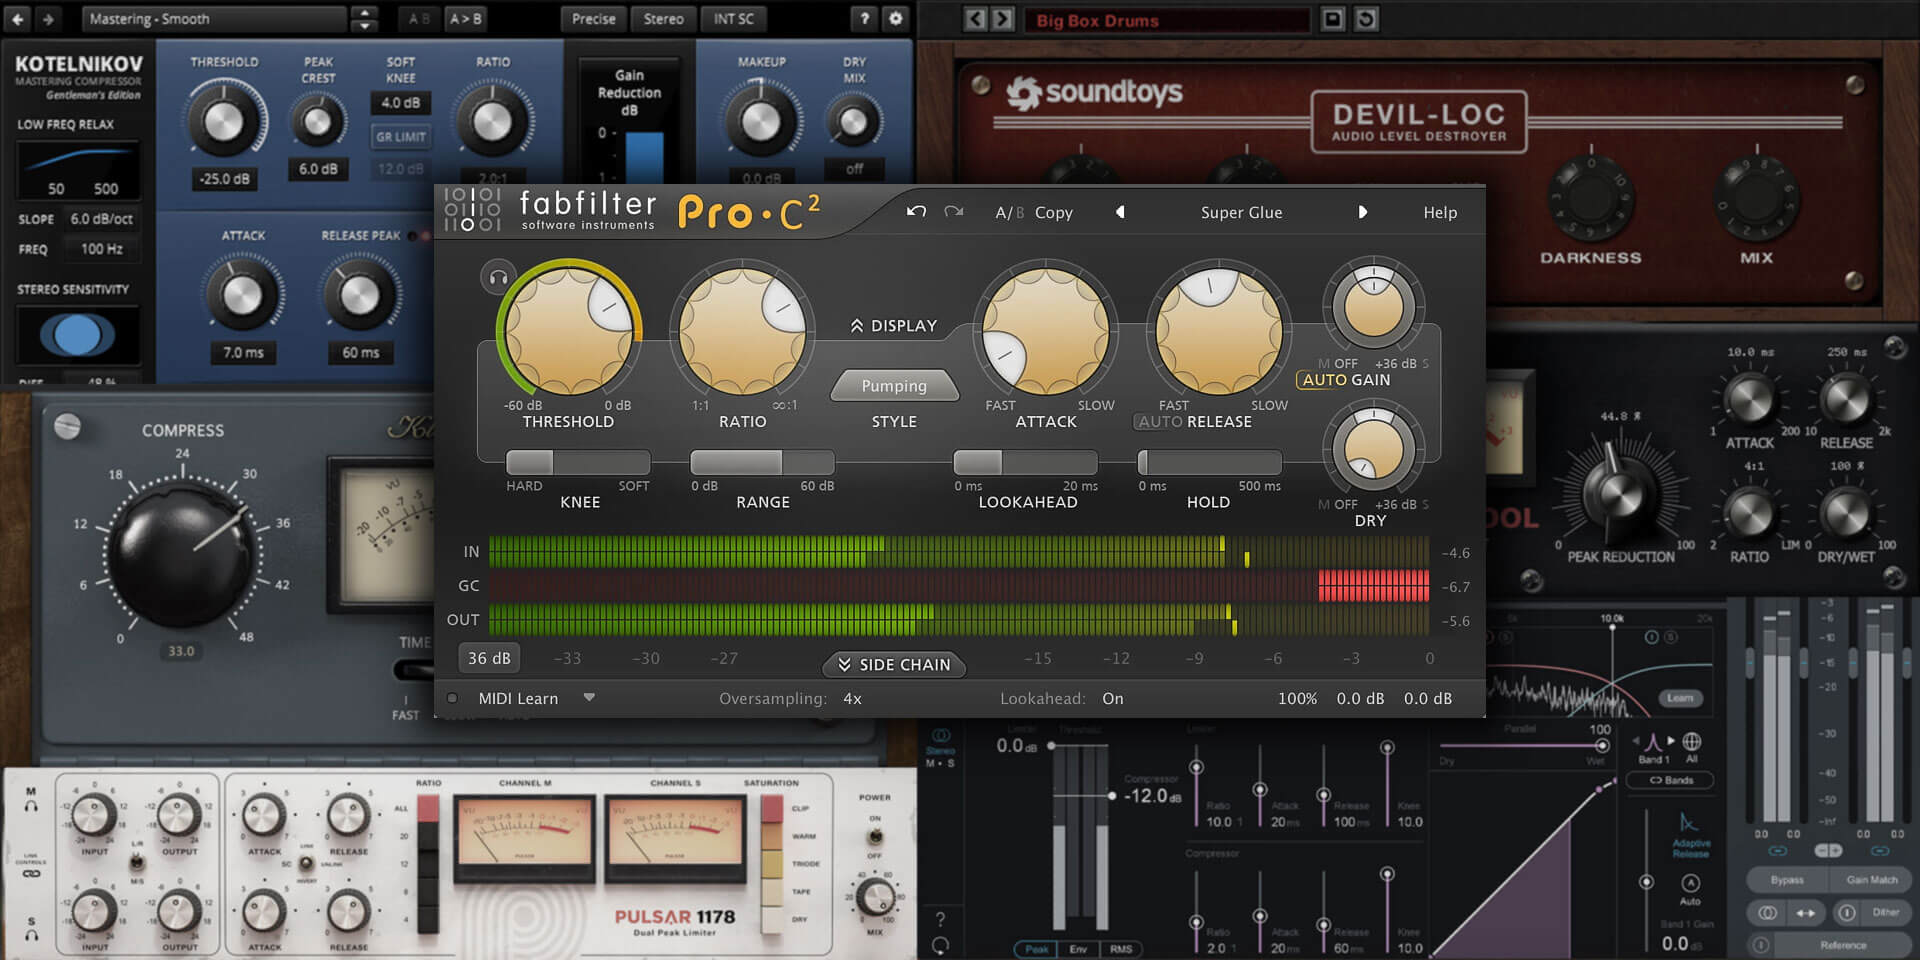
Fabfilter Pro C-2 plugin is a digital compressor that has 8 unique styles of compression, like Vocal, Bus, Mastering, Pumping, or Punch. Its Retina interface has animated level knee displays, with a customizable knee from hard to 72dB soft. This plugin also has a side-chain EQ section with HP and LP filters that can be customized and an extra filter that you may adjust freely. Furthermore, users can turn the smooth lookahead feature on and off to enable zero-latency processing. On top of that, this plugin has an intelligent automatic gain function, auto release, very fast attack times, and it can perform a hold of up to 500 ms.
The interface is adjustable by using 3 different sizes. Here you will also find a Smart Parameter Interpolation feature, a comparison function of undo/redo and A/B, and auto setting of all parameters accurately to the sample. You can even set a range of the gain change from 0% to 200%. Next, you can use the Audition Triggering function to detect parts of the audio track triggered by FabFilter Pro-C 2 and see the compression level applied there.

How does It sound?
Customizable filters, smooth lookahead, and a wide range of the gain allow you to achieve a fairly high sound level. This so-called "polishing" is an essential part of making good music. As a result, the processed musical compositions sound much better and more pleasant. Separately, I would like to note that this plugin provides impressive peaks taming on drums and snares.
Summary
Fabfilter Pro C-2 contains all the tools you need to create quality music. The presets are created in a way so that everyone can use them, and you will gradually master more complex functions. The user-friendly and intuitive GUI will help you with this. The only drawback of Fabfilter Pro C-2 is that the system requirements for this software are pretty high. Otherwise, it's an excellent choice for beginners and professional music producers.
Tech specifications
- Platform: Mac, Windows.
- Formats: AAX, AU, VST, VST3.
- System requirements - Mac: macOS 10.12 or later, only 64 bit.
- System requirements - Windows: Microsoft Windows 7 or later, 32/64 bit.
TDR Kotelnikov GE – best budget
From this TDR Kotelnikov GE review, you will learn more about this modern compressor that combines high accuracy dynamic range control with musical versatility. You will find out what features it comprises, its advantages and disadvantages, and what sound this plugin gives in practice.

Main features
Being the latest generation of such software, the TDR Kotelnikov GE plugin combines all essential features from its predecessors and modern solutions. For example, to increase the accuracy, the processing structure here is the 64-bit multi-rate one. Yin and Yang modes control the distortion behavior of the compressor. Delta preview feature allows you to monitor the difference between your original sound and the compressed one. Another advantage of this plugin is a new "Advanced" mode in which stereo linking is optimized for the stereo bus. On top of that, it has 10 extra user preset slots for personal customization.
The user interface is not fully customizable, but you can choose between 100%, 125%, and 150% rescaling. Next, we have 2 quality modes called "Insane" and "Live," with the main low latency as their feature. Various knobs and settings allow you to control over "low relax" slope, gain reduction limit, peak, and RMS events. Moreover, thanks to the versatile side-chain high-pass filter, you get a continuously variable control over slope and frequency. Also, some minor features, like inertia timing mode, equal loudness bypass, output gain trimming, or Left&Right sensitivity, complement this plugin's extensive set of tools and functions.

How does It sound?
TDR Kotelnikov GE does everything you can think of and even more. The compression itself is done very fast, and despite that, the sounding is natural and clear, without any artifacts. The dynamic processing feature works effectively, and the final sound has no "by-products," which can occur in some compressor plugins. And, of course, the advanced stereo linking mode is also worth mentioning, for it shows impressive results regarding RMS Compression. After I do the mastering with this plugin, my audio tracks become more distinctive, and the sound itself becomes much more pleasant to listen to.
Summary
Tokyo Dawn Records constantly improves this plugin with updates, but even now, it comprises a comprehensive choice of tools that help you compress the sound. And to figure everything out, you get extensive documentation explaining all its features. On the other hand, it may take a lot of time for you to master all its aspects and options, and this software can load your CPU very hard, so make sure your PC passes all requirements.
Tech specifications
- Platform: Mac, Windows.
- Formats: AAX, AU, VST2, VST3.
- System requirements - macOS 10.9 or later, only 64 bit.
- System requirements - Windows: Microsoft Windows 7 or later, 32/64 bit.
iZotope Ozone 10 Advanced – also a great choice
In this iZotope Ozone 10 Advanced review, we embark on a journey through the dynamic realm of audio mastering and mixing. Renowned for its versatility and ability to achieve professional-grade results, iZotope Ozone has emerged as a powerful tool in the industry.
As an avid mixing enthusiast, I have thoroughly explored this powerful suite and now eagerly share my findings. Join me as we delve into the features, capabilities, and performance of iZotope, unlocking the secrets to professional-grade audio mastery.
Key features

iZotope Ozone 10 Advanced offers a range of powerful features that enhance the audio mastering process. From its comprehensive equalizer to its versatile applications, this software provides a robust toolkit for achieving top results. Let me tell you more about them.
Equalizer
The equalizer in iZotope Ozone 10 Advanced is a standout feature with precise control over frequency bands and shaping capabilities. With a wide range of adjustable parameters, users can fine-tune the audio's tonal balance, correct resonances, and eliminate unwanted frequencies. Whether you want to enhance individual tracks or master an entire mix, the equalizer in iZotope Ozone 10 Advanced provides the flexibility and control necessary for achieving desired sonic results.
Dynamic EQ
The dynamic EQ feature in iZotope Ozone 10 Advanced combines precision equalization with flexible compression. It selectively applies EQ adjustments based on the audio's dynamic content, allowing you to control tonal imbalances and address resonances. This powerful tool is ideal for shaping the tonal balance and adding warmth to different elements in your audio.
Dynamics
The suit offers a dynamics module that provides precise control over audio volume and impact. With compressors, limiters, and transient shapers, you can shape the dynamics of individual tracks or the overall mix. This module helps you achieve balance, control peaks, and transients, and enhance the punch and clarity of your audio.
Exciter
The exciter module in iZotope Ozone adds harmonics and character to your audio. It offers various distortion modes, allowing you to create unique tonal flavors and colorations. By selectively applying harmonic content to specific frequency ranges, the exciter brings out details and depth in your sound, whether you want to add warmth to vocals or give instruments an edge.
Spectral shaper
The spectral shaper module in iZotope Ozone 10 Advanced provides precise control over the spectral content of your audio. By adjusting frequency ranges, you can shape the tonal balance and dynamics of your tracks. With settings for gain, attack, release, and threshold, you can target specific frequencies and make fine adjustments. The "Listen mode" feature enables real-time monitoring of the applied changes.
Vintage modules in iZotope Ozone 10 Advanced

Ozone features vintage modules that faithfully recreate the sonic characteristics of classic analog hardware. These modules offer unique ways to enhance your mixes with a vintage touch.
Vintage tape
The Vintage Tape module in iZotope Ozone 10 Advanced adds warmth, subtle distortion, and saturation reminiscent of analog tape machines. As an author, I find that using the Vintage Tape module adds a pleasant vintage flavor to my mixes, making them sound more organic and inviting.
To use the Vintage Tape module effectively, you can adjust the input and output levels to match the desired loudness. By tweaking the Bias control, you can shape the amount of harmonic distortion and saturation. Increasing the Bias imparts more warmth and saturation while decreasing it results in a cleaner sound. Additionally, the Speed control allows you to emulate different tape speeds, influencing the frequency response and transient handling.
Examples of how to apply the Vintage Tape module include using it on drum tracks to add warmth and subtle compression, applying it to vocals to give them a vintage character, or using it on a full mix to add a cohesive analog feel.
Vintage limiter
The Vintage Limiter module in Ozone 10 Advanced plugin replicates the behavior of classic hardware limiters, providing transparent peak limiting with a touch of vintage character. I appreciate the Vintage Limiter for its ability to control the dynamic range of my mix while adding a subtle analog flavor.
Functionally, the Vintage Limiter offers controls for adjusting input and output levels, as well as the release time. By setting the input level, you can determine the amount of limiting applied. The output level control allows you to match the loudness of the limited signal with the rest of your mix. The release time control influences how quickly the limiter recovers after reducing peaks.
Apply Vintage Limiter to the master bus to ensure controlled peaks and add a touch of vintage color to the overall mix.
Vintage EQ
The Vintage EQ module in iZotope Ozone 10 Advanced accurately emulates the sound of classic analog equalizers. It offers various vintage EQ curves and tonal shaping options to enhance your mix's overall balance and color. Personally, I find that the Vintage EQ adds warmth and character to my masterpieces.
When using the Vintage EQ, gentle boosts or cuts can be applied to shape the frequency response. Experimenting with different vintage EQ models, such as Pultec-style or Neve-style EQs, allows you to achieve different tonal characteristics. For instance, you can use a Pultec-style EQ to add weight to the low end and smooth out the high frequencies or employ a Neve-style EQ for precise and focused tonal shaping.
Vintage compressor
The Vintage Compressor module in iZotope Ozone 10 Advanced emulates the behavior of classic analog compressors. Using the Vintage Compressor, I've found it effective in smoothing out peaks, adding sustain, and providing cohesiveness to individual elements of my mix.
The Vintage Compressor offers features such as threshold, ratio, attack, and release controls. Adjusting the threshold sets the level at which compression is applied, while the ratio determines the amount of gain reduction. By manipulating the attack and release settings, you can shape the compression envelope to suit your desired sound.
How does It sound?

iZotope Ozone 10 Advanced provides a diverse range of modules that greatly enhance the sound production process. Let's delve deeper into some of these modules:
Stabilizer module
The Stabilizer module in iZotope Ozone 10 Advanced is a versatile tool that helps refine and stabilize the sound production process. It effectively smooths out audio inconsistencies, resulting in a more cohesive and balanced mix.
I find the Stabilizer module invaluable in achieving a refined and professional sound. Its dynamic adjustments create a controlled and even mix, elevating the overall quality of the audio production.
Impact module
The Impact module is a powerful tool for shaping the impact and energy of your audio. Its ability to control the attack and sustain of individual elements allows for precise manipulation and emphasis, effectively bringing certain elements forward or pushing them back in the mix. It adds depth, presence, and captivating quality to the mix, making the audio truly stand out.
Magnify soft clip in Maximizer module
The Maximizer module in iZotope Ozone 10 Advanced VST incorporates the Magnify Soft Clip feature, which plays an essential role in maintaining high fidelity while increasing loudness. This feature applies subtle saturation, allowing for increased levels without introducing harsh clipping artifacts. This preserves the dynamic range and overall clarity of the mix, resulting in a transparent and professional sound. With the Magnify Soft Clip feature, I can confidently push the boundaries of loudness without compromising the integrity of the audio.
Recover sides in Imager module
The Imager module includes the highly useful Recover Sides feature, enabling width reduction without sacrificing stereo information. This feature provides the flexibility to adjust the stereo width while retaining the original spatial characteristics of the mix. It allows for precise control over the width of the audio, resulting in a well-defined and captivating soundstage.
Master rebalance
The Master rebalance feature in iZotope Ozone 10 Advanced offers real-time functionality for adjusting the levels of individual elements within a mix. This tool allows me to fine-tune the balance between vocals, instruments, and other elements without the need for separate stems. By utilizing DAW automation with the Master Rebalance feature, I can dynamically control the levels of different elements throughout the song. It helps achieve a meticulously balanced mix with seamless transitions and professional sound.
Low-End focus
The Low-End focus feature offers the ability to shape the clarity, punch, and definition of the bass and sub-bass frequencies. I've used this feature to fine-tune the low end, ensuring a tight, impactful bass that doesn't overpower the mix. With its advanced controls, one can achieve a well-balanced mix where the low frequencies are controlled and blend harmoniously with the rest of the audio spectrum.
Summary
By harnessing the capabilities of these modules within iZotope Ozone 10 Advanced, music producers and sound engineers can elevate their sound productions to new heights.
In this review, I have endeavored to thoroughly examine the comprehensive capabilities of iZotope Ozone 10 Advanced, a powerful tool for mastering and mixing audio. With its advanced artificial intelligence capabilities, iZotope Ozone provides precise control over your audio production. Notable additions such as the Stabilizer and Impact modules further expand its capabilities. All in all, iZotope Ozone 10 Advanced proves to be an effective tool for achieving exceptional audio results.
Tech specifications
- Platform: Mac, Windows.
- Formats: AAX, AU, VST2, VST3.
- System requirements - Mac: macOS 10.13.6 or later, 64-bit only.
- System requirements - Windows: Microsoft Windows 10 or later, 64 bit only.
Soundtoys Devil-Loc Deluxe
Today one can find the Soundtoys Devil-Loc Deluxe review, where one checks all the necessary information about this sound amplifier. Using its features, one can add presence and tube-like warmth that amplify the perceived loudness of any material and get virtual headroom above digital maximum. On top of that, it is compatible with 64-bit devices.

Main features
Usually, sound amplifiers do not possess many features, but the Devil-Loc Deluxe plugin has some of them. For starters, one can enhance the loudness of most of the known program material. The next feature is that this plugin is capable of creating a warm vibe, character, and dynamic excitement that can be heard from vintage analog amplifiers. Virtual headroom is an important parameter, and this amplifier is capable of going beyond the digital maximum. Since signal overload is an issue to be reckoned with, Devil-Loc Deluxe VST helps percussive peaks to pass without any problem.
Within this plugin, one will find 2 modes that ensure high flexibility and allows utilizing creativity to the fullest, namely Band-split and Direct. Another aspect these modes are responsible for is supporting optimal DSP usage. One can add various sound effects starting with subtle, tube-like harmonic characteristics containing warmth, presence, and thickness and continuing with straightforward saturation distortion emulating. With its vast tools, one can add to your clipped signals an additional dynamic range. Topped with a simple, utilitarian design, this sound amplifier is a good choice for all musicians: beginners and professionals.

How does it sound?
This plugin truly gets the meaning behind the vintage sound. By using it, one could create that extra dimension to the mixes. With additional depth, the audio tracks gained some juicy and rich color. Thanks to its high quality, it is really hard to get those annoying negative sonic artifacts, unless they are the goal. Creating epic music with pumping loud sounds was never that easy for me before this plugin. Magical, warm signals with a wide range of sounding, and simple design allows even an amateur to perform amazingly. It is especially good with drums and vocals. This plugin can be considered a great invention for any musician.
Tech specifications
- Platform: Mac, Windows.
- Formats: AAX, AU, VST2.
- System requirements - Mac: macOS 10.10 or later, 64-bit only.
- System requirements - Windows: Microsoft Windows 7 or later, 64-bit only.
Pulsar Audio 1178
I want to share a rather interesting tool with you, so I have prepared a Pulsar Audio 1178 review in this article. This software, created by Pulsar Audio, thoroughly emulates the original 1178 hardware in all aspects, from tonal color to compression character. Here you will find information about the most important features of Pulsar Audio 1178, and I will share with you my experience of how this plugin works.

Main features
Pulsar Audio 1178 plugin is a FET-style compressor that accurately emulates its hardware predecessor but also enhances it with modern technologies and functions that broaden your possibilities for sound mastering. Among its features, you will find 4 modes for the optional saturation stage: Tape, Warm, Triode, and Clip. Also, Full sidechain EQ supports a feature of monitoring the reaction of the compressor to specified frequencies.
I was pleasantly astonished by the function of changing the compressor response time. Unlike analog devices that compress the signal as it enters the compressor, the Pulsar 1178 allows you to shift this moment forward or backward with Look-ahead and Look-behind features. So, for example, you can activate the compressor 10 milliseconds earlier or later to get an interesting effect from the pre-compression and delayed compression of transients.
Pulsar Audio 1178 plugin provides Mid/Side encoding and decoding that help make the sound more distinctive. In addition, you can use very accurate and modern peak and RMS meters to monitor any essential indicators for your music.

Besides, this plugin has a handy scrolling view feature that fits all its functions on 1 screen, and the smart GUI, which has draggable resize handles, adjusts itself depending on the output configuration. Topology Preservation technology maintains transparency of the sound and aggressive peak-eating behavior of the plugin.
How does It sound?
It is an excellent tool for changing transients to the required degree with high-quality sounding. 1178 plugin allows quick control over transients while giving a rich sound with colorful tones. It is also a good choice to make vocals more distinctive and aggressive. While working with drums, I noticed that it allows you to catch crashes in a flash and open up the top end of the signal while still preserving the natural sound. The bass and master compression is provided by transparency, speed, and sidechain EQ that helps to control the full frequency spectrum.
Tech specifications
- Platform: Mac, Windows.
- Formats: AAX, AU, VST2, VST3.
- System requirements - Mac: macOS 10.9 or later, 4 GB RAM, OpengGL 2.0 compatible GPU, 1GB free disk space, 64-bit only.
- System requirements - Windows: Microsoft Windows 7 or later, 4 GB RAM, OpengGL 2.0 compatible GPU, 1GB free disk space, 64-bit only.
Best free compressor plugins review
ADHD Levelling Tool
I present you with an ADHD Levelling Tool review. Here, you will find out about the features and system requirements of this plugin, and on top of that, I will tell you about its main advantages.

Main features
It is a simple compressor emulator with few features, but it does what a compressor should do. Above all its features, I would especially highlight such as 4x oversampling, 64-bit internal processing, and high accessibility as it is supported by a wide range of Windows and Mac OS devices. Also, the ADHD Levelling Tool plugin has 2 main knobs that control gain and peak reduction and 4 additional knobs responsible for dry/wet mix, ratio, attack, and release.

How does it sound?
From my experience, this compressor is ideal for working with vocals. Moreover, you can add more character and tame the peaks on any track in your mix.
Tech specifications
- Platform: Mac, Windows.
- Formats: AAX, AU, VST, VST3.
- System requirements - Mac: macOS 10.10 or later, 32/64 bit.
- System requirements - Windows: Microsoft Windows 7 or later, 32/64 bit.
Klanghelm MJUC jr.
I have prepared for you a Klanghelm MJUC jr. review. You will learn the main features of this compressor, its functions, advantages, and disadvantages. I will also share my impressions of working with it.

Main features
MJUC jr. plugin has 3 controls and 1 observing element. Knobs on the left and right control the gain of compression and makeup, respectively. Also, a timing switch with 3 positions determines the attack and release timings, the slew rate, and saturation. I liked it has a meter to display additional information and create a fitting image of the old-school compressor. Yes, maybe MJUC jr. does not have unique features, but it does pretty well with the basic tasks while being a freeware plugin.

How does it sound?
Klanghelm MJUC jr. can do smooth leveling or heavy pumping effects, depending on your goal. By combining natural compression sounding with more straightforward sounding technologies and harmonics, I can get a highly deep and energetic sound. Usually, I use it on bass guitar and vocals, and it tames the peaks, so I get a nice and even loudness.
Tech specifications
- Platform: Mac, Windows.
- Formats: AAX, VST, VST3.
- System requirements - Mac: macOS 10.9 or later, 64-bit only.
- System requirements - Windows: Microsoft Windows 7 or later, 64-bit only.