For this review, I’ve selected Delay TAPE-201 from Arturia as a tape delay VST plugin. Why this particular instrument? It emulates a legendary analog device — Roland RE-201 Space Echo Tape Delay/Reverb. To my mind, the vintage-peculiar sound successfully comes together with a flexible software solution in this plugin. So, in this Arturia Delay TAPE-201 review, I will ponder upon the peculiarities of this plugin and explain what makes it so great.
Main features
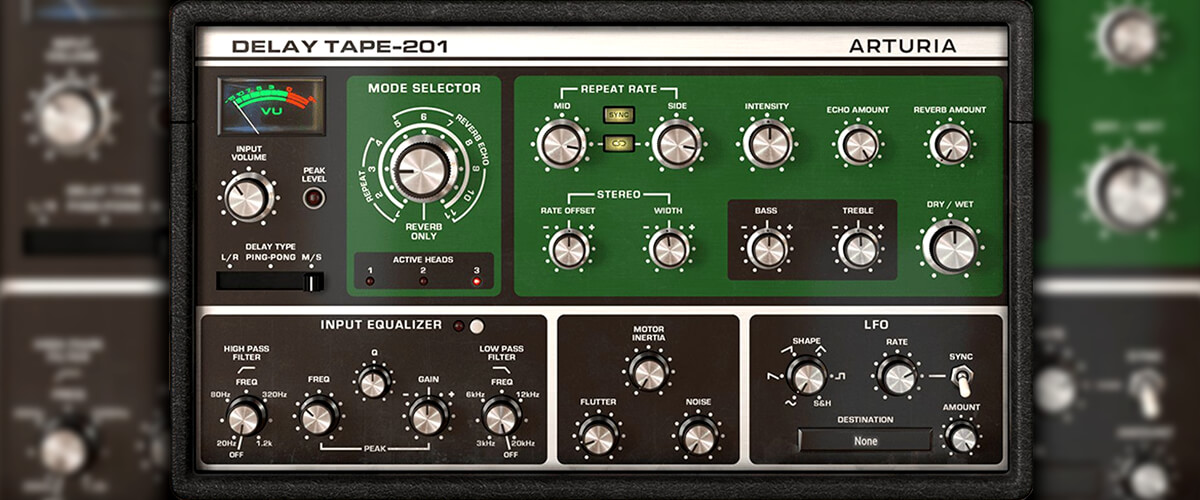
Let’s look into the main features of the Arturia Delay TAPE-201 plugin to get a better idea of its capabilities.
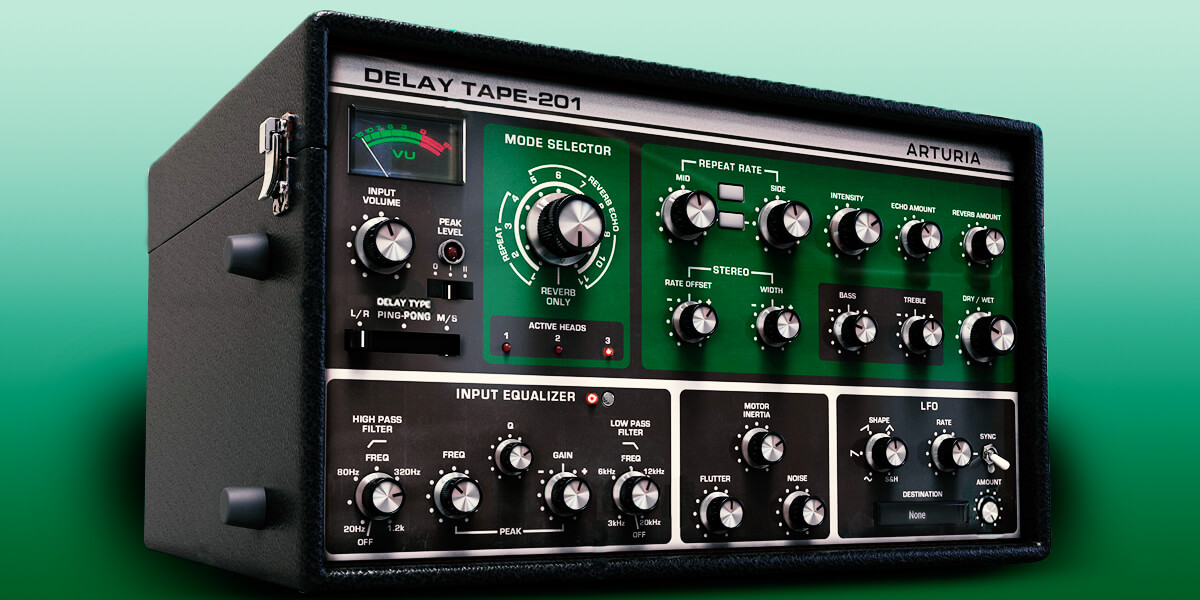
First, I suggest checking the Input Volume, which allows you to adjust the input volume of a signal. The value you set will greatly impact the saturation level. Higher input volume level results in a signal greatly saturated with harmonics. The peak level will point at the availability of peaks that go higher than 0db. Right below this indicator, you will find a toggle switch for changing preamp operation modes. You get a clean and undistorted signal when set to the ‘0’ value. ‘I’ stands for Original RE-201 preamp imitation. Finally, ‘II’ means Arturia’s vintage Germanium preamp.
With Delay type, you can select between different delay types, which include:
- L/R — a standard mode for delay effects that transmits the left and right channels through the entire plug-in processing chain.
- Ping-pong — works similarly to L/R, passing the signal from the left and right channels, but interchangeably. The processed signal is reproduced from the left and right channels in turns.
- M/S – is an uncommon mode for delay plugins, which splits the signal into Mid (mono) and Side (stereo) and transmits them through the entire processing cycle of the device. Because of this, you can achieve an enjoyable and broad sound.
A few words about the Mode selector, which determines how the 3 tape playback heads and reverb tank are combined. In the Reverb only mode, you will get a spring reverb signal, which intensity you can regulate with the Reverb volume knob. With Active heads, you will see which delay heads are presently active.
The 1-4 modes are handy when you want to hear how delay heads and their combinations work. As you switch to 5-11 modes, delay heads are mixed with reverb to let you create a sound that resembles echo. With such a great number of combinations, you can create completely different styles and grooves, which can be useful in absolutely any style.
Now let’s talk about the Repeat rate. I find it to be convenient for setting the delay time. Using the Sync button, you can link it to the project note length, while the Link button (a chain-like one) allows you to synchronize the parameters or set different values for the left and right channels or Mid and Side, which in its turn, allows you to achieve a wide sound.
Also, the Delay TAPE-201 plugin unlocks access to additional stereo capabilities that let you achieve a spacious sound in a Stereo block. The Width knob is here to let you narrow or broaden the stereo field. At the same time, with the Rate Offset regulator, you can additionally desynchronize the channels in time and pitch, getting a sort of Haas effect.
It’s good to have the Intensity parameter that sets the amount of echo signal reinjected into the echo chamber. So, it may resemble the Feedback parameter many of you have probably gotten used to. Also, there is an Echo volume that gives you space to adjust the output level of the echo. The Dry/Wet knob regulates the original and processed signal ratio.
The timbre block comes as Bass (sets the number of low frequencies) and Treble (sets the amount of treble) controls. Equalization works gently, allowing you to carefully shape the sound timbre at the output.
To fine-tune the signal, there is an Advanced button in the upper right corner of the plugin’s interface. It opens additional settings of incoming signal equalization. As you use Low-pass and High-pass filters, you will set the low and high-frequency cutoff. With the EQ peak frequency, you can set which frequency you want to give the most presence.
Motor interia sets the time the tape motor needs to switch between two rates. Flutter is the amount of frequency wobble introduced by irregularities in tape speed. Noise enables you to mix in analog noise.
The LFO block is a godsend for everyone who is involved in creating special effects. It gives its users the possibility to module any delay parameter with shapes. You can pick a specific parameter in the Destination drop-down menu and adjust the LFO amount and Rate time to your liking.
How does It sound?
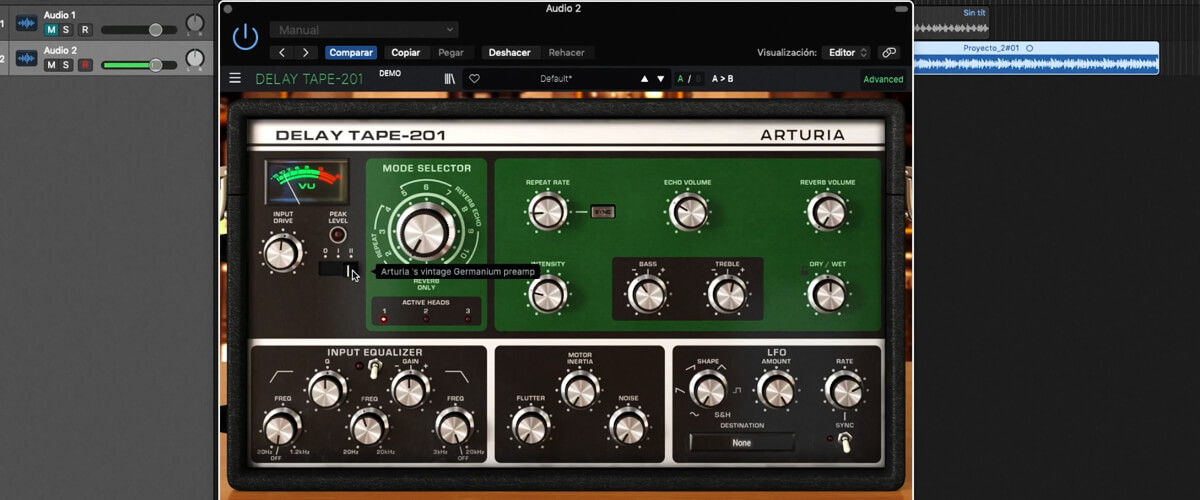
As this delay plugin is highly versatile, you can use it to work with different genres. For instance, this is my go-to tool when I work on Reggie mixes. It allows me to add spring reverb to the delayed signal and better convey the style of the genre. And, in general, when it comes to spatial guitar processing, there is hardly a better plugin than this tape delay VST. Using an LFO tool, I can create unique wah-wah effects listeners love.
This plugin also turned out to be quite practical when working with vocals. The preamp feature is particularly helpful because it allows me to add vintage-like saturation and give more prominence to the sound. In addition, I achieve a beautiful depth effect as I use this delay with the high Intensity (feedback) value at the end of vocal phrases. And when I strive to make a broader lead vocal, I use Stereo imaging capabilities.
My favorite percussion approach is to create syncopated rhythms with the delay effect. Thanks to the flexibility of parameter settings and the Mid/Side mode, I always achieve amazing results.
Tech specifications
- Platform: Mac, Windows.
- Formats: AAX, AU, NKS, VST, VST3.
- System requirements – Mac: macOS 10.13 or later, OpenGL 2.0 compatible 4 cores CPU, 3.4 GHz (4.0 GHz Turbo-boost) or M1 CPU, 1GB HDD, only 64 bit.
- System requirements – Windows: Microsoft Windows 10 or later, OpenGL 2.0 compatible 4 cores CPU, 3.4 GHz (4.0 GHz Turbo-boost), 1GB HDD, only 64 bit.

